
This article is the second part of the article “Rhino GH- C# Scripting Basics – For Loops”. We will look at creating a series of points with the help of loops and some input parameters in Grasshopper. This article is intended for beginners in C#. Enjoy!

Now, we got how to create loops in the script editor, great! Let’s look at some examples of how we can connect the learned with the Rhino API.
Get the example file on github
1. For Loop with input parameters
We create a new C# component and add new input parameters.

- Zoom in close to the component until small + and – icons appear. Now add a new parameter under the y parameter by clicking on the plus symbol. Repeat this until we have created the generic x, y and z parameters.
- Now rename the input parameters x, y and z to “start”, “end” and “incrX”. Go with the mouse pointer to one of the input parametrs and right-click to open the context pop-up menu and change the name in the first line. Repeat this with the others.
- We have to define the appropriate object type for the respective input parameter in the script component. You can do this under component menu->type hint. Now set all three parameters to the type integer (“int”).
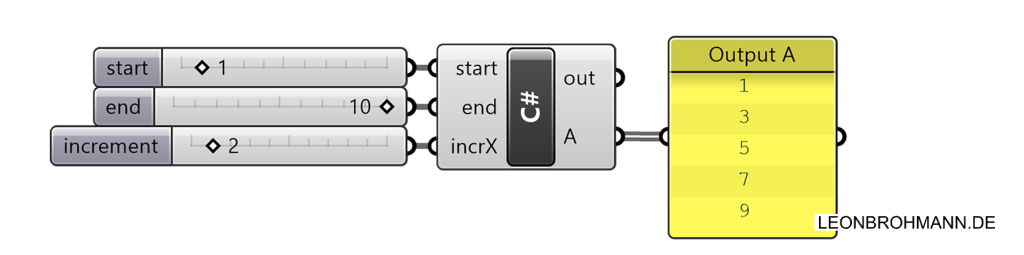
Create 3 sliders that you connect to the respective input parameters start, end and increment. Copy the code below into the C# script editor of the c# component.
    // We are creating a new integer List instance with the name "lst"
    List<int> lst = new List<int>();

    //We do not need to declare the instances start
    //, end and incrX in the script editor -
    //we have already done this in the Grasshopper environment.
    for (int i = start; i < end; i += incrX)
    {
      // The list is filled with a new element
      lst.Add(i);
    }

    //The list instance is passed to the output parameter
    // and makes the list accessible in the Grasshopper environment.
    A = lst;
In the C# script we can now access the input parameters by using the same names. If you now change the input slider in Grasshopper, you will see how the values of the output parameters change.
2. Point row
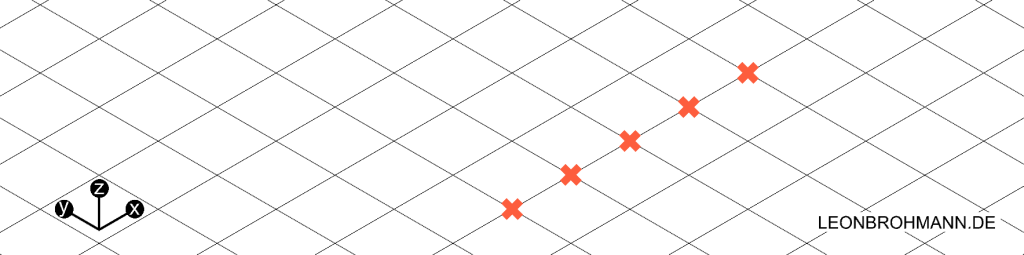
Let’s now create Rhino geometry objects. We create a row of points with a few lines of code. Instead of an integer list, as in the previous examples, we declare a new list of the type Point3d – Rhino’s point data type.

    // We are creating a new Point3d list instance with the name "lst"
    List<Point3d> lst = new List<Point3d>();

    for (int i = start; i < end; i += incrX)
    {
      //A new Point3d is born!
      //In the round Brackets you have to add the x,y,z values,
      //The x value of a new point will be increased every loop.
      Point3d pt = new Point3d(i, 0, 0);

      lst.Add(pt);
    }

    A = lst;
In every Loop i is increasing by the value of the input parameter “incrX”, as long as i is smaller then the inputparameter “end”. The starting value of i is the value of the inputparameter “start”. In every loop a new Point ist created, with the x position is defined by the increment value i. The new Point is added to the list “lst”.
3. Point grid – a nested loop

Aber was ist wenn wir ein Punktraster erstellen wollen, anstatt einer Punktreihe? Einfach! Wir erstellen eine loop in einer loop – ,auch genannt ,nested loop. Wir erstellen, wie in den vorigen Beispielen 1 und 2 neue integer Inputparameter.However, what if we want to create a point grid instead of a row of points? Easy! We create a loop in a loop – also called a nested loop. As in previous examples 1 and 2, we add new integer input parameters to the c# component.

As always – copy the code below to the grasshopper c# Script Editor of the component.
    List<Point3d> lst = new List<Point3d>();

    for (int i = startX; i < endX; i += incrX)
    {
      //CAUTION!
      //The statement value "i" may only be declared once!
      //We use the name "u" in the second loop
      for (int u = startY; u < endY; u += incrY)
      {
        // The x and y value of a new point will be increased every loop.
        Point3d pt = new Point3d(i, u, 0);

        lst.Add(pt);
      }
    }

    A = lst;
As a result, we see a generated point grid. With each pass of the “i” loop, the entire “u” loop is executed, creating a row of dots each time. (See example 6). The output is a continuous list – what this looks like with a typical Grasshopper data tree structure is shown in the next example.
A little exercise for you: So far, this grid is in 2D. What would the code for a 3D grid look like?
4. Datatree

If you want to combine C# script components with common grasshopper components, it might be helpful to work with data tree structures. The code example should be understandable, please write me if there are any difficulties.
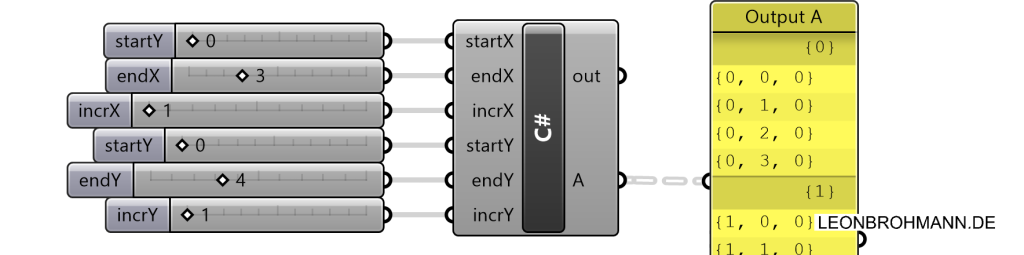
As always – copy the code below to the grasshopper c# Script Editor of the component.
    // We are creating a new Point3d DataTree instance with the name "tree "
    DataTree<Point3d> tree = new DataTree<Point3d>();

    for (int i = startX; i < endX; i += incrX) // "i" Loop
    {
      // We need to create first some datatree path adresses.
      // (The numbers with the {} Brackets)
      GH_Path pth = new GH_Path(i);

      // "u" Loop
      for (int u = startY; u < endY; u += incrY)
      {
        Point3d pt = new Point3d(i, u, 0);

        // We add the point and the path to the data tree instance.
        tree.Add(pt, pth);
      }
    }

    A = tree;
We create a new GH_Path instance with the ongoing path address of the data tree every pass of the “i” loop. The rest of the structure is the same as in example 3, except that we also add the corresponding path address to the data tree.
We learned how to create point rows and grids using a C# script.Great! If you still have questions, just write me a comment or directly via leonbrohmann(at)gmx.de.